
A polished Mixcloud set starts with strong source files, clean gain staging, and an export that preserves your transitions. This Mixcloud upload quality guide recommends WAV, AIFF, or FLAC tracks, or MP3 files at 320 kbps, and at least 6 dB of headroom while recording. Those choices give you a solid foundation before the final upload.
You know the feeling: a mix sounds powerful in your headphones, then loses punch or reveals harsh peaks after export. The fix isn’t simply turning everything up. Set levels with care, avoid clipping, and make thoughtful edits to keep the energy intact from the opening blend to the final track.
Use these practical steps to choose your files, balance levels, apply normalization and limiting carefully, and export a clear mix. You’ll also learn what to listen for during playback, so your final file feels controlled, dynamic, and ready to share.
Key Takeaways
- Choose clean source files and build your set from tracks that hold up through recording and playback.
- Use normalization and limiting with restraint so your mix stays controlled without losing its dynamics.
- Watch for overlapping peaks as you mix, and leave room to refine the sound after recording.
- Edit transitions carefully, export with suitable audio settings, and listen through the finished file before uploading.
Choosing source music file quality
Start with clean, high-quality tracks before adjusting levels or exporting. The quality of your source files shapes what remains after streaming compression.
-
Choose a Recommended Source Format
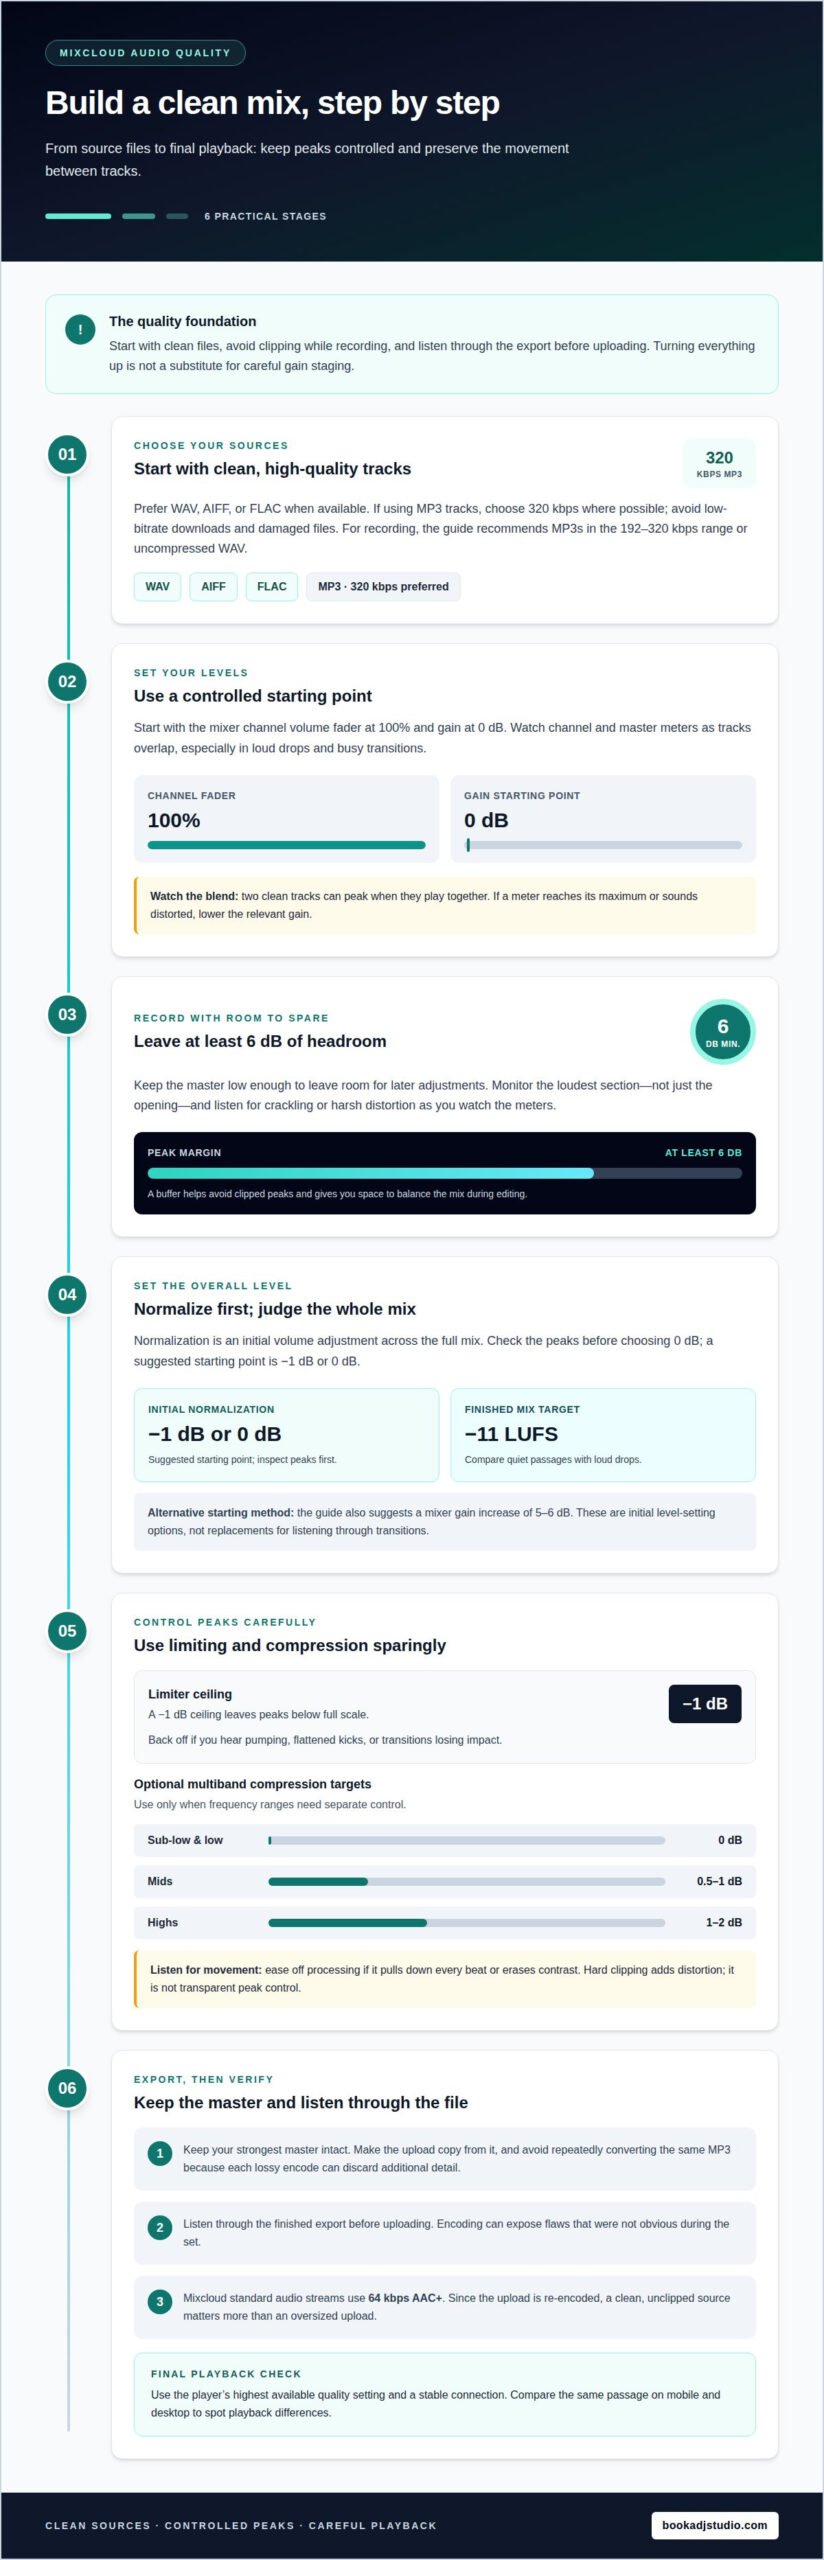
Start with WAV, AIFF, or FLAC when those files are available. These formats preserve more source detail than a compressed MP3, giving your mix a stronger starting point. If you use MP3 tracks, choose files at 320 kbps where possible; avoid low-bitrate downloads and damaged files. For recording, aim for MP3s in the 192-320 kbps range or uncompressed WAV.
-
Select the Recommended Upload Format
Choose an upload format that suits your needs for a clear, widely supported upload. Keep the source file intact until you’ve listened through the export, because encoding can expose flaws that weren’t obvious during the set. A WAV or AIFF master can also preserve uncompressed audio before upload, but don’t mistake a larger file for a guaranteed better stream.
-
Account for Mixcloud Re-Encoding
Prepare for streaming conversion: Mixcloud’s standard audio streams use 64 kbps AAC+. That means listeners don’t receive your uploaded file bit-for-bit, so a clean, unclipped source matters more than an oversized upload. Avoid repeatedly converting the same MP3, since each lossy encode can discard additional detail. Keep your strongest master and make the upload copy from it.
- Use the same source-file workflow in Romania regardless of account plan: choose WAV, AIFF, FLAC, or a 320 kbps MP3. Improve mobile and desktop playback by selecting the player’s highest available quality setting and using a stable connection. Compare the same passage on both devices to spot playback differences.
- Find the current maximum upload size and duration in Mixcloud’s uploader before preparing a long set. File size depends on duration, format, and bitrate, so a two-hour mix in WAV takes more space than the same set encoded as MP3. If an upload fails, confirm the export format, inspect the file for corruption, and retry with a stable connection.
Audio normalization, limiting, and compression
Aim for consistent playback without flattening the movement between tracks. Normalize first, then use limiting or compression only when they address a real level problem.
-
Normalize the Audio
Start by normalizing the full mix as an initial volume adjustment. A suggested starting point is -1 dB or 0 dB, but inspect the peaks before choosing 0 dB. If you prefer adjusting the mixer instead, a gain increase of 5-6 dB is another suggested starting method. These approaches set the initial level; they don’t replace listening through transitions. For a finished mix, aim for -11 LUFS, then compare quiet passages and loud drops so listeners hear a balanced performance.
-
Apply Limiting
Set a limiter on the full mix to control peaks from individual tracks, and use it sparingly to preserve dynamics. During fine-tuning, a -1 dB limiter ceiling gives peaks room below full scale. Listen for pumping, flattened kicks, or transitions that lose impact; reduce limiting if those changes appear. Hard clipping at -3 dB is sometimes suggested as a level treatment, but it adds distortion rather than transparent peak control. Use it only as an intentional sound, not a clean-mix fix.
-
Use Compression
Add multiband compression only when frequency ranges need separate control. A restrained starting target is 0 dB compression for sub-low and low frequencies, 0.5-1 dB for mids, and 1-2 dB for highs. These small amounts can steady the tonal balance without flattening the groove. Solo no band while judging the full mix; check how kick, bass, vocals, and percussion interact together. Back off if the compressor pulls down every beat or erases contrast.
For a recording where levels can be monitored as the mix unfolds, audio recording for DJ sessions supports a focused capture from the first transition onward.
Treat normalization as an initial adjustment across the entire audio clip, with the guide recommending -1db or 0 dB. It also suggests a final normalized DJ mix volume of -11LUFS, so initial level-setting and the final loudness target serve distinct stages.
A limiter across the full mix can control clipping from individual tracks, but use it sparingly to preserve dynamics. Recheck the mix after level adjustments, aiming for reliable playback while retaining movement and contrast in your performance.
Avoiding clipping and leaving headroom
Protect the transient punch of your tracks before the final export. Keep the master level controlled and leave room for later adjustments.
-
Prevent Audio Clipping
Set the mixer channel volume fader to 100% and gain to 0 dB as your starting point. Watch the channel and master meters as tracks overlap, especially during loud drops. If a meter reaches its maximum or sounds distorted, lower the relevant gain rather than pushing the master harder. Check transitions too, because two clean tracks can peak when they play together.
-
Leave Headroom
Record your DJ mix with at least 6 dB of headroom. Keep the master level low enough to leave room for later adjustments, rather than recording right against the ceiling. This buffer helps avoid clipped peaks and gives you space to balance the mix during editing. Compression can raise peaks, so headroom matters before processing as well as during recording.
- Monitor the loudest section, not just the opening track. A kick, bassline, and percussion hit can combine into a stronger peak during a busy transition. Listen for crackling or harsh distortion as you watch the meters. If either appears, lower the channel or master level and record that passage again. Lowering the volume after clipping won’t restore the lost waveform.
- Make deliberate gain adjustments throughout the set. When a new track enters, compare its level with the playing track before fully opening the fader. Adjust channel gain to avoid sudden jumps, then listen through the blend at performance volume. Leave headroom on the master; a loud meter alone won’t make the recording clearer.
- Review the recorded file before normalization, limiting, or export. Check the loudest transition and the sections where several tracks overlap. If the waveform is already clipped, return to the recording stage instead of relying on a limiter to repair it. A clean capture with 6 dB of headroom gives later processing room to work.
Editing, splitting, and exporting mix files
Make precise edits before rendering the final mix. Keep a pre-master copy so you can revisit transitions without rebuilding the set.
- Trim the opening and ending in your audio editor. Remove accidental silence or handling noise, but preserve the first beat and final decay if they shape the performance. Listen around each edit point: cutting through a reverb tail or transition can sound abrupt. Save a separate working copy before editing the full recording.
- Split the mix only when separate sections serve a clear editing purpose. Label each part in order, then check that adjacent files join cleanly, without gaps or repeated audio. For a continuous DJ set, keep the transitions together in the final render. This preserves the flow listeners expect from a recorded performance.
- Export a pre-master copy as WAV or AIFF at a 44,100 kHz sample rate and 16-bit depth with dither. Use this uncompressed render as the source for final processing. Dither belongs at the bit-depth conversion stage; avoid applying it repeatedly to successive exports. Keep the original recording and pre-master distinct.
- Render an upload copy from your finished pre-master, then check the beginning, middle, and end of the file. Listen for clipped peaks, missing sections, abrupt edits, or export errors. Compare the rendered file with the session playback at the same point. If something has changed, correct the session or export settings and render again.
- Keep filenames clear, such as “Set Name Pre-master” and “Set Name Upload.” This simple distinction helps prevent uploading an unfinished version. For a dedicated capture of your next set, book a DJ studio recording session and focus on the performance while it’s recorded.
Choose music files in WAV, FLAC, AAC or AIFF format for DJ mixes, as recommended on the page. Keep that guidance in mind when preparing the mix and its export, then check the rendered upload copy after processing. Streaming services and websites will compress and down-sample high-resolution audio files to 128 kbps, according to the guide. Do not assume an upload will retain the pre-master’s original quality; listen to the copy intended for listeners before sharing it, and make sure it still plays as expected.
Book a DJ Studio
Book a DJ Studio gives you a dedicated space to practise your set and capture a polished performance. Use Hourly Studio Access for a focused session, or choose Session Packages for multiple visits. Audio Recording helps you capture the mix for review or sharing, while 4K Video Recording adds a visual record of your performance. These options can help when you want to concentrate on transitions, record a fresh set, or prepare audio and video content in one studio session. Bring your track plan and the sound you’re aiming for; the recording setup supports the next stage of your Mixcloud workflow. Keep refining your craft, then let the mix speak for itself. Contact Book a DJ Studio to discuss your next session.
Make Your Next Set the One You’re Proud to Share
Treat every upload as part of your sound’s evolution. Build on what you learn from each set: which transitions felt strongest, where the energy shifted, and how the recording translated beyond your headphones. Make notes after each session and use them to shape the next performance. That feedback loop turns technical choices into a more confident signature behind the decks.
Use this mixcloud upload quality guide as a reference when you prepare another recording, but keep your own creative instinct in the mix. The right workflow supports the performance; it shouldn’t flatten the character that makes the set yours. When you’re ready to create in a dedicated studio environment, contact Book a DJ Studio and plan your next session.
Shape your vision, trust your ears, and keep the momentum moving. Your next mix is another chance to take listeners on a journey.
Frequently Asked Questions
How can I check audio loudness, clipping, and peak levels before uploading to Mixcloud?
Use a Mixcloud upload quality guide as your final checklist: scan the exported file with your audio editor’s loudness and peak meters. Replay the loudest transition and inspect the waveform for flat-topped peaks. Listen for crackle or harsh distortion, too. Focus your Mixcloud upload quality guide on the rendered file, and repeat these checks after any changes before uploading.
What are Mixcloud’s recommended audio bitrate, sample rate, and channel settings?
Export the upload as an MP3 at 320 kbps. For a WAV or AIFF pre-master, use a 44,100 kHz sample rate and 16-bit depth.